
AWS Cli notes
Here are some notes about how to use AWS Command Line Interface. May also include screenshots if a browser-based operation is shown.
Create IAM role
Use Identity and Access Management (IAM) to grant control access to the users (you and your team members).
IAM helps you give (some) controls of you AWS resources to your team members without giving your own AWS account. Each member cannot get their own AWS crendientials that allows them perform some operations (e.g. start/terminate a new instance), and you can revoke their crendientials anytime if needed.
Create a group
Create a group and grant desired access/policy.
Here I am going to create a group EC2group and let the group member has full access of AWS EC2 APIs.
- Click the
Groupson left panel - Click the
Create New Groupbutton to walk through th New Group Wizard - Enter
EC2groupas the Group Nmae - Select
AmazonEC2FullAccessin Attach Policy - Review and create the group.
Create a user
Create a user and attach to the group.
Here I am going to create a user as spencer and only allows him to use command line tools.
- Enter
spencerin the User name - Click
Programmatic accessin Access type
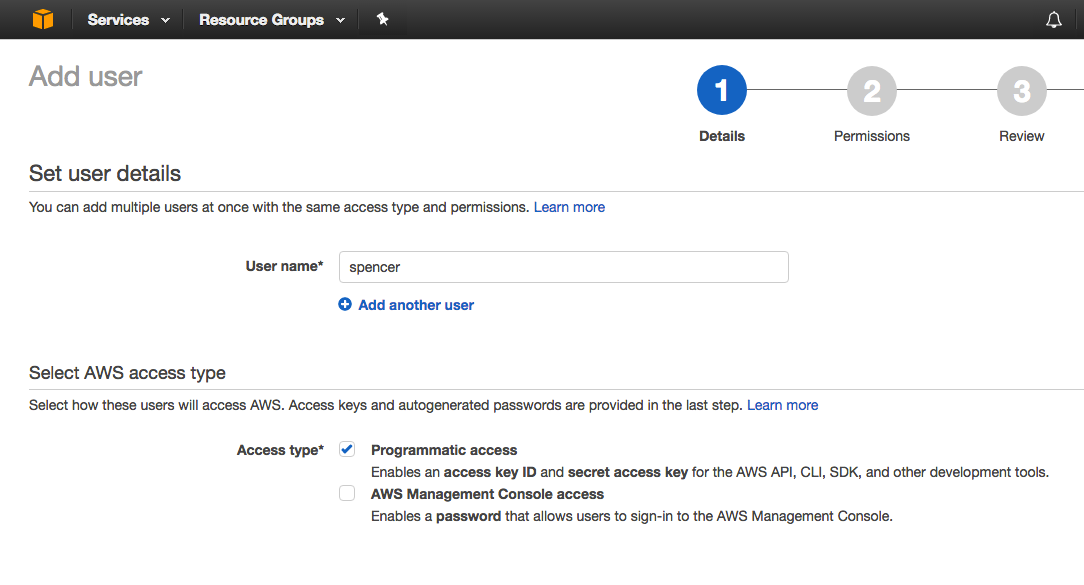
You can also click AWS Management Console access, which allows the user to use browser based solution.
That is, create an account/password for AWS console for this user.
- Click next.
- Select
EC2groupand continue.
You will see something like this
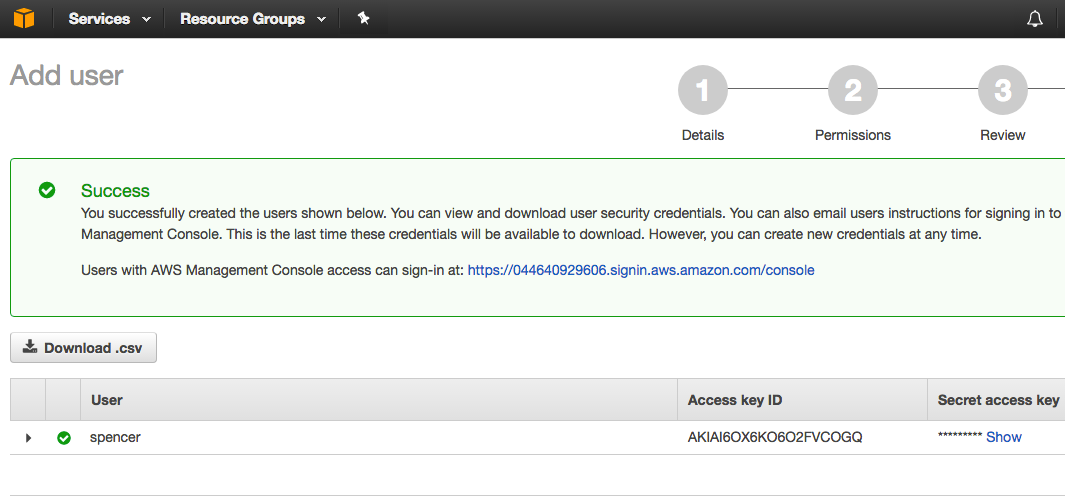
The Access Key ID and Secret access key are what you need.
Click button Donwload.csv and given this csv to you team member spencer.
Note that you cannot retrieve Secret aceess key after leaving this page. But you can create new credentials at any time.
Install and configure AWS Cli
When the credential (i.e. Access Key Id and Secreat access Key), you can use AWS cli to control the resource via command line.
Create new configuration
http://docs.aws.amazon.com/cli/latest/reference/configure/
We can create a profile for each credential/user.
In this example, the profile name is spencer, and the region is set to us-east-2
Region map
# or omit the --profile to create a default profile
aws configuration --profile spencer
AWS Access Key ID [None]: YOUR-ACCESS-KEY
AWS Secret Access Key [None]: YOUR-SECRET-Access-Key
Default region name [None]: us-east-2
Default output format [None]: json
Note: If you have multiple profiles, you can set default profile via environment variable.
export AWS_DEFAULT_PROFILE=spencer
In the rest of post, all the commands use default profile.
Create an EC2 instance
The service of creating virtual machine on AWS is EC2. Before creating an instance on EC2, we need the set up the following steps
Create a security group
Here I will create a security group with group name spencer
Note that your group name must NOT start with sg-
aws ec2 create-security-group --group-name spencer --description "security group for development environment in EC2"

# it should return group id
{
    "GroupId": "sg-fd94b196"
}
Configure the security group
Now, I am going to configure the security group so that it allows tcp from all everywhere (–cidr 0.0.0.0/0)
Note:
In production, you should consider a network for better security.
aws ec2 authorize-security-group-ingress --group-name spencer --protocol tcp --port 22 --cidr 0.0.0.0/0
Create Key pair
You need a key pair to connect to an instance (e.g. via SSH)
In this example, I will save the key pair as spencer-key.pem
aws ec2 create-key-pair --key-name spencer-key --query 'KeyMaterial' --output text > spencer-key.pem
You have to change the permission of the key
chmod 400 spencer-key.pem
Create an instance
http://docs.aws.amazon.com/cli/latest/reference/ec2/run-instances.html
Here I am going to create one t2.micro instance with ami-id ami-8b92b4ee (Ubuntu 16.04 LTS)
aws ec2 run-instances --image-id ami-8b92b4ee \
                      --instance-type t2.micro \
                      --count 1 \
                      --security-groups spencer \
                      --key-name spencer-key \
                      --query 'Instances[0].InstanceId'

# should return
"i-0b2f546393036526f"
Start an instance
Turn off the machine
aws ec2 start-instances --instance-ids i-0b2f546393036526f
Stop an instance
Shutdown the machine
aws ec2 stop-instances --instance-ids i-0b2f546393036526f
Terminate/Detele an instance
Remove such machine from EC2
aws ec2 terminate-instances --instance-ids i-0b2f546393036526f

# should return
{
    "TerminatingInstances": [
        {
            "CurrentState": {
                "Code": 32,
                "Name": "shutting-down"
            },
            "InstanceId": "i-0b2f546393036526f",
            "PreviousState": {
                "Code": 16,
                "Name": "running"
            }
        }
    ]
}
Connect to an instance
Here we will use the key to connect the instance via SSH.
First, find the Public Ip address from detailed information
aws ec2 describe-instances --instance-ids i-0b2f546393036526f

# assume the public IP is 52.34.56.78
Connect the the instance using the key we downloaded
ssh -i spencer-key.pem ubuntu@52.34.56.78
Custom instance
In real cases we need cutomer instances for our application. Here is an example that
- p2.xlarge (with GPU)
- Ubuntu 16.04 LTS
- 100 GB SSD as root device VolumeType list
- 200 GB Magnetic device
aws ec2 run-instances --image-id ami-6d48500b \
                      --instance-type p2.xlarge \
                      --count 1 \
                      --security-groups spencer \
                      --key-name spencer-key \
                      --query 'Instances[0].InstanceId' \
                      --block-device-mapping '[
                           {
                             "DeviceName": "/dev/sda1",
                             "Ebs": {
                                       "DeleteOnTermination": true,
                                       "VolumeSize": 100,
                                       "VolumeType": "gp2"
                             }
                           },
                           {
                             "DeviceName": "/dev/sdb",
                             "Ebs": {"VolumeSize": 200}
                           }
                      ]'
You can also save the block-device-mapping to a file, say, block-dev.json
aws ec2 run-instances --image-id ami-6d48500b \
                      --instance-type p2.xlarge \
                      --count 1 \
                      --security-groups spencer \
                      --key-name spencer-key \
                      --query 'Instances[0].InstanceId' \
                      --block-device-mapping file:block-dev.json
Simple Storage Service (S3)
Mount S3 bucket on a OSX or Linux instance
The idea is to mount the bucket using s3fs, thus we need to
- Install and s3fs set s3 credential locally
- Get the bucket name via s3api
- Mount the bucket using s3fs
Step 1: Install s3fs on the machine
OSX
brew cask install osxfuse
brew install s3fs
Ubuntu
sudo apt-get install automake autotools-dev fuse g++ git libcurl4-gnutls-dev libfuse-dev libssl-dev libxml2-dev make pkg-config

sudo apt-get install s3fs
Set S3 credential for s3fs
echo ACCESS_KEY:SECRET_KEY > ~/.passwd-s3fs
chmod 600 ~/.passwd-s3fs
Step 2: Get bucket name(s)
Then use awscli to list the bucket name(s)
aws s3api list-buckets --query "Buckets[].Name"
# assume it returns my-s3-bucket
Step 3: Mount the bucket
Assume you want to mount it at my-s3-mount with read and write permissions
s3fs my-s3-bucket my-s3-mount -o unmask=0022
You can check it using command mount, you shoud see something like
s3fs@osxfuse0 on /Users/spencer/my-s3-mount (osxfuse, nodev, nosuid, synchronous, mounted by spencer)
To unmount
fusermount -u my-s3-mount
Sync S3 bucket on EC2 instance
aws s3 sync s3://my-s3-bucket my-s3-drive
Updated:
Leave a Comment